

Un rapport de la Cour des comptes consacré aux systèmes d’information et de communication de l'Élysée révèle un sous-effectif persistant, 18 ordinateurs manquants, un manque de sensibilisation à la cybersécurité et une gestion particulièrement défaillante de son projet « le plus coûteux ».
Chaque année, le rapport de la Cour des comptes consacré à la gestion des services de la présidence de la République propose un « contrôle approfondi » d'un domaine d'activité particulier. Après s'être intéressé aux ressources humaines (2018), à l’organisation des services (2019), à la sécurité (2020), à l’immobilier et au patrimoine (2021), cette année, la Cour a examiné les systèmes d’information et de communication, « gérés par un service dédié et qui mobilisent 5 % de son budget, ce qui représente un niveau satisfaisant au regard d’entités de tailles comparables et compte tenu des contraintes de sécurité ».
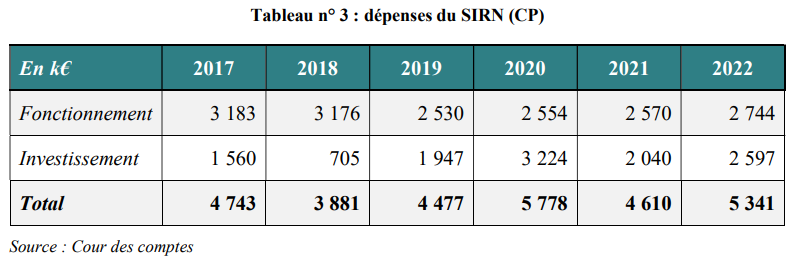
On y apprend que l’informatique non classifiée y est gérée par le service de l’informatique, des réseaux et du numérique (SIRN), « composé de 28 agents dont un responsable » et organisé en trois départements et deux cellules :
- un département des projets du SI (DPSI) de huit personnes, chargé de la conduite des projets et de l’environnement mis à disposition sur les postes de travail ;
- un département d’exploitation et d’administration technique (DEAT) de neuf personnes et un apprenti, responsable de l’administration technique du système ;
- un département d’assistance technique (DAT) de sept personnes et un apprenti, chargé de la mise à disposition de matériel et l’assistance informatique ;
- une cellule maintien en condition de sécurité (MCS) de deux personnes, pour assurer le travail de MCS et la veille technique ;
- un magasin, géré par une personne, chargé du stockage du matériel.
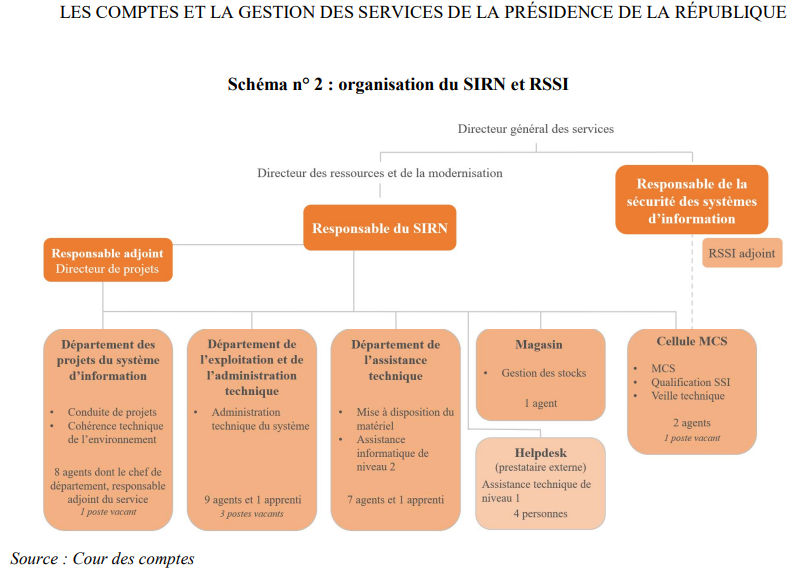
Le rapport souligne qu'une équipe de quatre personnes est dédiée aux enjeux de sécurité numérique et que « le RSSI, directement rattaché au DGS, dispose d’un adjoint et la cellule MCS, hiérarchiquement rattachée au SIRN, lui rend compte », tout en pâtissant d'un poste vacant.
« La dernière actualisation formelle de la politique de sécurité des systèmes d’information (PSSI) date de 2017 », s'étonne la Cour des comptes, pour qui la version en vigueur et mise à disposition des utilisateurs sur l’intranet, bien qu'annotée et consolidée de notes complémentaires, « mérite une mise à jour, notamment à la suite de la réorganisation des services de la Présidence en 2019, de l’évolution de la cybermenace et de l’actualisation du socle réglementaire ».
Des chartes informatiques utilisateur et administrateur sont par ailleurs formalisées mais, souligne le rapport, « celle à destination des administrateurs date de 2018 et mériterait d’être actualisée » :
« En outre, il est prévu qu’elle soit signée par les administrateurs à titre d’engagement, mais cela n’est en pratique pas fait. Il n’est pas exigé aux nouveaux arrivants de signature de la charte utilisateur, ce qui pourrait renforcer sa prise en compte. »
Microphones et caméras désactivés pour des raisons de sécurité
La Cour des comptes estime de même que la politique de sensibilisation devrait elle aussi être renforcée, à mesure qu'elle se structure « autour d’une séance à destination des nouveaux arrivants », tout en pouvant être alimentée de séances complémentaires « si le RSSI [...] le juge nécessaire » :
« Afin de renforcer cette sensibilisation, la séance des nouveaux arrivants devrait être rendue obligatoire et la sensibilisation réalisée sur une base annuelle. La Présidence pourrait s’inspirer des mesures prises au niveau interministériel en chargeant le conseiller "numérique et données" de sensibiliser le reste du cabinet aux enjeux de sécurité numérique, voire en créant une instance à haut niveau consacrée à la sécurité numérique. »
Une réflexion est par ailleurs en cours sur la conduite de campagnes d’hameçonnage. La Cour estime en tout état de cause que cette sensibilisation devrait certes s’adresser au personnel de l’Élysée, « y compris aux hautes autorités, mais également aux autres agents publics et aux visiteurs (par exemple, en rappelant l’interdiction d’introduire des téléphones portables, montres connectées et autres objets connectés lors de réunions sensibles) ».
Le rapport évoque cela dit « une sécurité technique robuste », un SI « supervisé en temps réel par l’ANSSI », et « fréquemment audité », que ce soit par des prestataires de confiance (PASSI) dans le cadre des homologations, par le RSSI et son adjoint, ou par l’ANSSI pour les sujets les plus sensibles :
« L’ANSSI apporte également son soutien pour renforcer la sécurité du SI : elle supervise en temps réel les évènements de sécurité anonymisés. Les notes d’injonction relatives à des vulnérabilités identifiées transmises par l’ANSSI aux ministères le sont également à la Présidence, qui en tient compte. »
La Cour relève que les programmes de mises à jour automatiques « ne sont pas autorisés pour les équipements réseau à cause de leur exposition sur internet », et que « l’administration à distance est proscrite » :
« Par exemple, l’utilisation des postes nomades sécurisés pour réaliser des webconférences à partir de l’outil interministériel mis à disposition par la DINUM a nécessité des travaux avancés car les microphones et caméras étaient désactivés pour des raisons de sécurité. »
L’infrastructure, composée d’une centaine de serveurs virtualisés, « est pour l’essentiel gérée manuellement par les équipes du DEAT ». Or, « aucun programme de mise à jour n’est installé sur les équipements réseau du système d’information, ce qui conduit à un besoin en main d’œuvre importante », d’autant plus que les contraintes de sécurité s’appliquant à la Présidence multiplient les équipements à mettre à jour. La Cour relève cependant que le déploiement récent d’un outil d’automatisation informatique facilitera à terme la gestion de certaines parties de cette infrastructure.
Un sous-effectif persistant malgré les ors de la République
Le service est par ailleurs renforcé d’une équipe de quatre personnes externes pour assurer l’assistance technique de niveau 1, « helpdesk » qui a pour responsabilité principale la rédaction des tickets de demande ou d’incident sur la base d’appels utilisateurs à un numéro unique, mais qui réalise également des actions de mises à jour des téléphones ou ordinateurs.
Le rapport souligne que « bien que les indicateurs de pilotage qui permettent de suivre cette externalisation et le service qu’elle fournit présentent des résultats satisfaisants », une internalisation « doit être envisagée », à mesure qu'elle faciliterait les diagnostics et améliorerait la qualité et la performance du service :
« Cette internalisation ne conduirait en outre a priori pas à des surcoûts : le coût annuel du marché est de 358 000 €, alors qu’une internalisation coûterait de l’ordre de 250 000 €. »
Le rapport relève par ailleurs que, « hors assistance technique, le SIRN est confronté à une problématique de sous-effectif persistant, commune dans ce secteur d’activité ». Au 31 décembre 2022, quatre postes (dont ceux de deux responsables) étaient non pourvus (le responsable du DEAT, le responsable du DPSI – pourvu en avril 2023, un ingénieur MCS et un exploitant de niveau 1), « alors que le service a également récemment connu un renouvellement important (13 sorties et 10 entrées en 2022) ».
De plus, l’architecte technique et l’administrateur systèmes spécialisés Microsoft, rattachés respectivement au DPSI et au DEAT, ont depuis quitté leurs postes au premier semestre 2023 sans que des remplaçants puissent, à la date du contrôle, être recrutés :
« Cette situation fragilise la gestion du système et requiert un investissement important du responsable de service et ses responsables de départements dans des activités opérationnelles, ne permettant pas d’allouer le temps nécessaire à la gestion prospective du SI, comme la modernisation des environnements applicatifs. »
Or, et malgré des rémunérations « dans l’ensemble attractives » par rapport au référentiel de l'administration, « le service peine à recruter », ce qui s’expliquerait en partie par l’interdiction d’administration du SI à distance, « faisant obstacle au télétravail pour le DEAT ».
La Cour des comptes propose de son côté d' « utiliser le levier des logements de fonction dont elle dispose pour renforcer l’attractivité » et, de manière générale, de porter une attention particulière à l’enjeu de fidélisation de ses équipes informatiques afin de résorber cette fragilité, « par exemple en ce qui concerne les conditions de travail (qualité des locaux, etc.) ».
18 des 907 ordinateurs de l'Élysée sont « à retrouver »
Évoquant « un pilotage stratégique à renforcer », la Cour relève que le comité directeur du numérique (CODIRNUM), créé en 2019 et censé, « théoriquement », se réunir deux fois par an, « ne s’est tenu qu’une fois en 2021 et 2022 », et que « plusieurs réunions n’ont pas fait l’objet de compte-rendu ».
Elle note également que, malgré la mise en place d’une comitologie et l’élaboration d’une prévision annuelle des réalisations, la Présidence ne dispose pas de schéma directeur pluriannuel « qui définirait des grands axes stratégiques pour atteindre un SI cible » et que « sans trajectoire définie, il est difficile de planifier son développement : renouvellement de composants structurants, structuration du déploiement d’outils au service des différentes directions ».
Un paragraphe intitulé « Une connaissance du parc matériel à consolider » révèle que le SIRN estime lui-même que son outil de gestion de l'inventaire ne recense que « 95 % des matériels » :
« Cette connaissance est toutefois imparfaite : des matériels sont identifiés comme "à retrouver" (par exemple 18 ordinateurs sur un parc actif de 907 postes) et l’outil ne recense pas systématiquement le matériel acheté par d’autres services que le SIRN. Par exemple, la direction de la communication a acquis des ordinateurs Mac sans que cette information ne soit renseignée dans l’outil. »
En outre, si des procédures de sauvegarde sont formalisées, « la Présidence estime qu’elles doivent être revues et mises à jour » :
« En effet, les sauvegardes ne sont pas réalisées par un outil centralisé mais via un ensemble de solutions intégrées à chaque système ; il n’y a pas de stockage externe de ces sauvegardes ; le service ne réalise pas de tests de restauration des sauvegardes. »
L'Élysée ne serait pas conforme au RGPD
Si, depuis l’entrée en vigueur du RGPD, les fonctions de RSSI et de délégué à la protection des données personnelles (DPD) sont assurées par la même personne, « la Présidence ne dispose pas d’un registre exhaustif des traitements de données personnelles » :
« Le DPD, avec l’appui du service métier traitant des données personnelles, a renseigné des fiches individuelles de traitements. Si ces dernières indiquent le responsable de traitement, la typologie des données et les mesures de sécurité mises en œuvre, elles n’identifient ni la base légale du traitement, ni la nécessité (ou non) d’effectuer une analyse d’impact relative à la protection des données. »
En outre, « certaines applications ou outils qui traitent des données personnelles ne font toutefois pas l’objet de fiche de traitement, comme le système de gestion des ressources humaines et l’outil de préparation de déplacements, qui traitent pourtant de données sensibles » :
« De plus, l’appropriation par les services de cet enjeu et l’intégration en interne de ce dernier semblent imparfaites. Le DPD n’est pas associé à l’ensemble des traitements impliquant des données personnelles. C’est le cas en particulier du système de vidéoprotection géré par la DSPR, dont les enjeux sont pourtant importants. »
Soulignant que « sa contribution est nécessaire pour assurer le respect de la réglementation », la Cour des comptes évoque pudiquement une « consolidation nécessaire en matière de protection des données personnelles », et conclut que « la sensibilisation des agents à la protection des données, comme individus et responsables de projets, mériterait d’être renforcée ».
Les nombreuses anomalies du projet le plus coûteux
Le rapport déplore en outre que « le SIRN ne dispose pas de méthodologie formalisée pour la gestion et la gouvernance des projets informatiques ». Elle évoque ainsi le projet de système d’information sur les ressources humaines (SIRH), lancé en 2019 avec pour objectif principal de remplacer l’utilisation de trois outils (SAGE pour la paie, GESPER pour le suivi des données personnelles et des effectifs et Excel pour des tableaux de bord), et qui constituerait le « projet applicatif ayant été de loin le plus coûteux » depuis 2017 :
« Toutefois, il n’a pas fait l’objet d’une phase de cadrage du besoin métier et l’acquisition du logiciel a été effectuée, en 2019, en dépit de l’opposition du RSSI. Les raisons du choix de cet outil, alors que d’autres outils étaient déployés en interministériel, ne sont plus connues. »
Et ce, alors que le logiciel est censé supporter la gestion de la paie et des congés, les absences, le télétravail et les indemnisations liées, mais qu'il « ne permet actuellement pas de répartir la masse salariale par direction, en l’absence d’interfaçage avec le système d’information comptable », et que « l’outil n’apporte pas satisfaction » :
« les anomalies sont nombreuses et chronophages à traiter ; les montées de version régulières engendrent des régressions (pertes de fonctionnalité) importantes. Des ressaisies et vérifications manuelles sont nécessaires. La résolution par l’éditeur des anomalies identifiées est parfois très longue, sans explication particulière et malgré l’existence de comités de suivi et de pilotage. »
Le rapport relève en outre que, et « par ailleurs, l’interconnexion avec le logiciel comptable n’est pas opérationnelle, alors que la mise en place de cette interface automatique est identifiée et annoncée dans les rapports de la Cour depuis 2018 », mais également que « l’application n’a pas pu être homologuée au titre de la sécurité informatique ou des données personnelles. »
La Cour des comptes en est réduite à constater que, faute de pouvoir accéder aux données présentes dans le SIRH, « le risque comptable inhérent à l’absence de contrôle sur ces informations reste pris en compte dans la carte des risques financiers de 2022 ».
Pour la Cour des comptes, le SIRH « illustre les défaillances qui peuvent résulter d’un cadrage et suivi insuffisants : nombreuses anomalies, interconnexion avec le logiciel comptable non opérationnelle depuis plusieurs années, homologation impossible au titre de la sécurité informatique et des données personnelles, prestations insuffisantes du prestataire ».
L’examen des contrats et factures afférentes laisse en outre apparaître « une estimation pas toujours adaptée des besoins pour les différents projets avec des prestations complémentaires ou des retraits d’engagement juridique » : « le suivi détaillé de l’ensemble des déploiements du SIRH est de ce fait particulièrement complexe, voire impossible, de même que le suivi de la performance et des résultats du prestataire. »
Le rapport évoque, de plus, « un contexte de relations complexes avec l’éditeur et de confiance fragilisée dans l’application », de sorte qu' « il ne paraît pas exister de voies pour que cette application donne enfin satisfaction » :
« Aussi, malgré l’importance des dépenses engagées et de l’investissement du service RH dans l’outil, la Présidence doit mettre en place un outil alternatif. »
En guise de conclusion, la Cour des comptes estime que si les systèmes d’information et de communication de la Présidence « respectent un standard de sécurité élevé et présentent un état satisfaisant », en revanche, « leur gouvernance manque, d’une part, d’une vision stratégique et, d’autre part, d’outils et de méthodologie formalisés ».


